Finding a Middle Ground Between Screen and UI Testing in Flutter
We outline the struggles we had testing our flutter app, our approaches to those challenges, and the solutions we arrived at to solve those problems.

Flutter provides good solutions for both screen testing and UI testing, but what about the middle-ground? With integration testing being a key level of the testing pyramid, we needed to find a way to test how features in our app interacted without the overhead involved with setting up UI tests. I’m going to take you through our testing journey from a limited native automated testing suite and heavy dependence on manual testing, to trying flutter’s integration testing solutions, to ultimately deciding to build out our own framework to increase confidence in the integration of our components.
The beginning of our Flutter testing journey
Up until early 2020, our mobile app was entirely native with separate android and iOS codebases. At the onset of our migration to flutter, the major testing pain point was that a large amount of manual regression testing was required in order to approve each release. This manual testing was tedious and time consuming for engineers, whose time is expensive. Alongside this manual testing pain, the automated testing in the existing iOS and android codebases was inconsistent. iOS had a larger unit testing suite than android did, but neither had integration tests. iOS also had some tests that were flaky, causing CI builds to fail unexpectedly.
As we transitioned to flutter, we made unit/screen testing and code testability a high priority, pushing for thorough coverage. That said, we still relied heavily on the manual testing checklist to ensure the user experience was as expected. This led us to pursue an integration testing solution for flutter. In planning out integration testing, we had a few key requirements for our integration testing suite:
- Easily runnable in CI upon each commit
- An API that would be familiar to developers who are used to writing flutter screen tests
- The ability to test the integration between features within the system without needing to set up the entire app.
The Flutter integration testing landscape
At the very beginning of our transition to flutter, we started trying to write integration tests for our features using flutter’s solution at the time: flutter_driver. The benefit we found in flutter_driver was that we could run it in our production-like environment against preset test users. This meant there was minimal test environment setup. We ran into quite a few issues with flutter_driver though. Firstly, there wasn’t a true entry point we could launch the app into because our app is add-to-app, meaning that the flutter code is embedded into our iOS and Android native applications rather than being a pure flutter app runnable from a main.dart entry point. Second, flutter_driver is more about UI/E2E testing rather than integration testing, meaning we’d need to run an instance of the app on a device, navigate to a flow we wanted to test, and then test the flow. Also, the flutter_driver API worked differently than the screen testing API and was generally more difficult to use. Finally, flutter_driver is not built to run a suite of tests or to run easily in CI. While possible to run in CI, it would be incredibly costly to run on each commit since the tests need to run on actual devices. These barriers led us to not pursue flutter_driver tests as our solution.
We then pivoted to investigating Flutter’s newer replacement for flutter_driver : integation_test. Unfortunately integration_test was very similar to flutter_driver, in that it took the same UI/E2E approach, which meant that it had the same benefits and drawbacks that flutter_driver had. The one additional advantage of integration_test is that it uses the same API as screen tests do, so writing tests with it feels more familiar for developers experienced with writing screen tests. Regardless, given that it has the same problems that flutter_driver does, we decided not to pursue integration_test as our framework.
Our custom solution to integration testing
After trying flutter’s solutions fruitlessly, we decided to build out a solution of our own. Before we dive into how we built it, let’s revisit our requirements from above:
- Easily runnable in CI upon each commit
- An API that would be familiar to developers who are used to writing flutter screen tests
- The ability to test the integration between features within the system without needing to set up the entire app.
Given those requirements, we took a step back to make a few overarching design decisions.
First, we needed to decide what pieces of code we were interested in testing and which parts we were fine with stubbing. Because we didn’t want to run the whole app with these tests in order to keep the tests lightweight enough to run on each commit, we decided to stub out a few problem areas. The first was our flutter/native boundary. With our app being add-to-app and utilizing plugins, we didn’t want to have to run anything native in our testing. We stubbed out the plugins by writing lightweight wrappers around them then providing them to the app at a high level that we could easily override with fakes for the purpose of integration testing. The add-to-app boundary was similar. The second area we wanted to stub out was the network. In order to do this, we built out a fake http client that allows us to configure network responses for given requests. We chose to fake the http client since it is the very edge of our network layer. Faking it left as much of our code as possible under test.
The next thing we needed to decide was what user experiences we actually wanted to test with our integration tests. Because integration tests are more expensive to write and maintain than screen tests, we wanted to make sure the flows we were testing were the most impactful. Knowing this, we decided to focus on “happy paths” of flows. Happy paths are non-exceptional flows (flows not based on bad user state or input). On top of being less impactful, these sad paths usually give feedback on the same screen as the input, meaning those sad path cases are usually better tested at the screen test level anyway.
From here, we set out to break down responsibilities of the components of our integration tests. We wanted to have a test harness that we could use to set up the app under test and the world that the app would run in, however we knew this configuration code would be mildly complicated and something that would be in flux. We also wanted a consistent framework by which we could write these tests. In order to ensure changes to our test harness didn’t have far reaching effects on the underlying framework, we decided to split out the testing framework into an independent package that is completely agnostic to how our app operates. This keeps the tests feeling familiar to normal screen tests since the exposed interface is very similar to how widget tests are written. The remaining test harness code was put in our normal codebase where it can be iterated on freely. The other separation we wanted to make was between the screen interactions and the tests themselves. For this we used a modified version of Very Good Venture's robot testing pattern that would allow us to reuse screen interactions across multiple tests while also making our tests very readable from even a non-engineering perspective.
In order to fulfill two of our main requirements: being able to run as part of our normal test suite in CI and having a familiar API, we knew we’d need to build our framework on top of flutter’s existing screen test framework. Being able to integrate (ba dum tss) these new tests into our existing test suite is excellent because it meant that we would get quick feedback when code breaks while developing. The last of our requirements was to be able to launch into a specific feature rather than having to navigate through the whole app. We were able to do this by having our app widget that handles dependency setup take a child, then pumping the app widget wrapped around whatever feature widget we wanted to test. With all these decisions made, we arrived at a well-defined integration testing framework that isolated our concerns and fulfilled our testing requirements.
The Nitty Gritty Details
In order to describe how our integration tests work, let's start by describing an example app that we may want to test. Let's imagine a simple social network app, igrastam, that has an activity feed screen, a profile screen, a flow for updating your profile information, and a flow for posting images. For this example, we’ll say we’re most interested in testing the profile information edit flows to start.
First, how would we want to make a test harness for this app? We know it has some sort of network interactions for fetching profile info and posts as well as for posting images and editing a profile. For that, our app has a thin wrapper around the http package called HttpClient. We may also have some interactions with native code through a plugin such as image_cropper. In order to have control over that plugin, this app has also made a thin wrapper service for that. This leaves our app looking something like this:
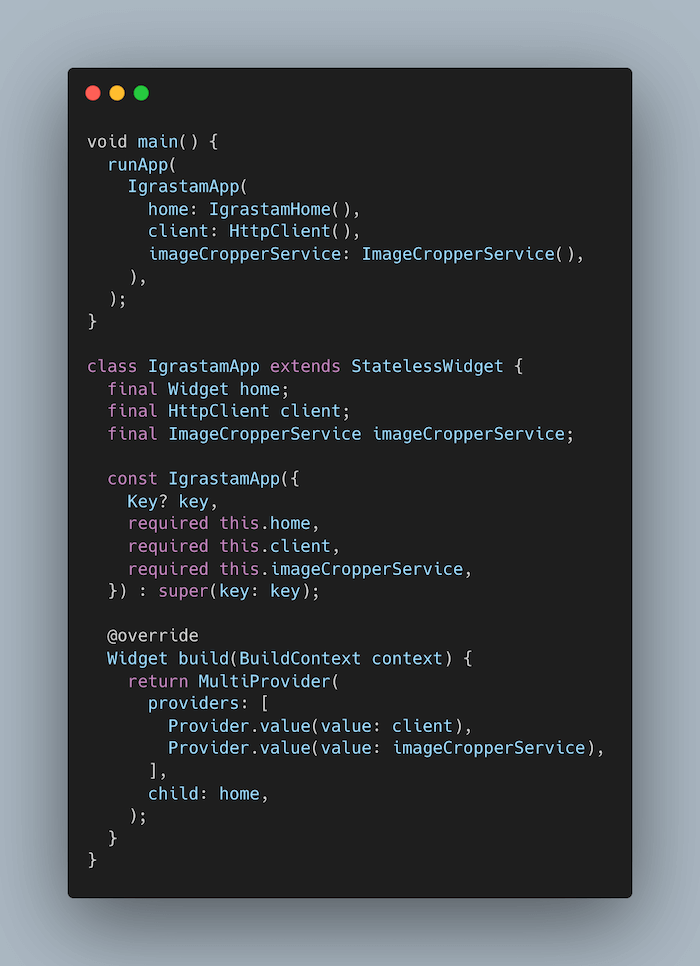
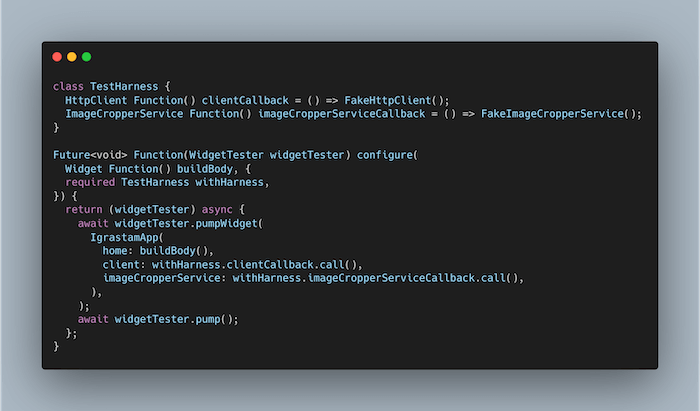
Given that this is approximately what the app looks like, the test harness needs to grant control of the HttpClient and the ImageCropperService. We can do that by just passing our own fake versions into the app.
Awesome, now that we have an app and a harness we can use to test it, how are the tests actually written? Let’s start out by exploring that robot testing technique I mentioned earlier. Say that we want to start by testing the profile edit flow. One path through this flow contains a screen for changing your name and byline, then it bounces out to picking and cropping a profile image, then allows you to choose a preset border to put on your profile picture. For the screen for changing your name and byline, we can build a robot to interact with the screen that looks something like this:
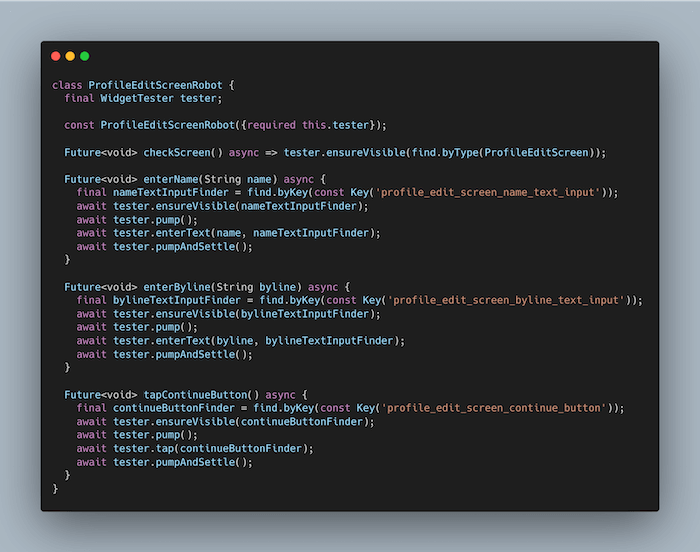
By using this pattern, we are able to reuse test code pertaining to this screen across many tests. It also keeps the test file clean of WidgetTester interaction, making the tests read more like a series of human actions rather than a series of code instructions.
Okay, we’ve got an app, a test harness, and robots to interact with the screens. Let’s put it all together now into an actual test. The tests end up looking incredibly simple once all of these things are in place(which was the goal!)
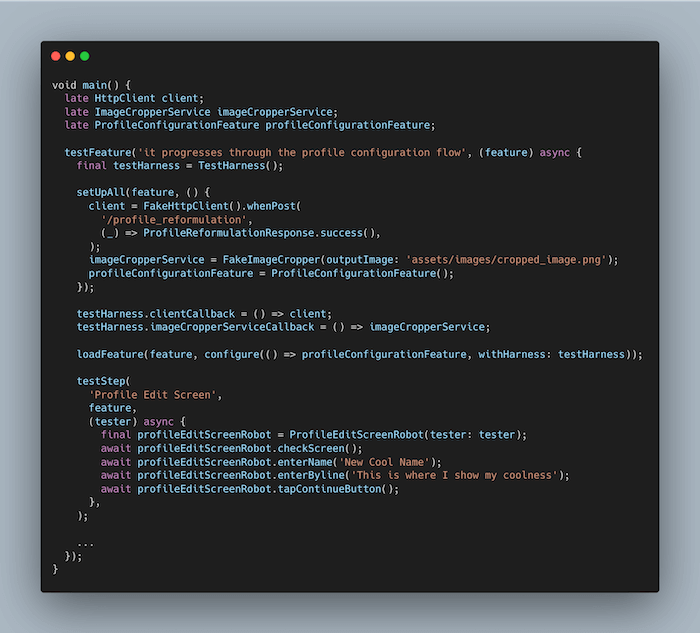
This test would go on to have a few more steps detailing the interactions on the subsequent screens. With that, we’ve been able to test the integration of all the components for a given flow, all written in widget-test-like style without needing to build out the entire app. This test could be added into our suite of other tests and run with each commit.
Back to the bigger picture
Integration testing in flutter can be daunting due to how heavy the flutter_driver/integration_test solutions are with their UI testing strategies. We were able to overcome this and begin filling out the middle level of our testing pyramid by adding structure on top of the widget testing API that allows us to test full flows from start to finish. When pursuing this ourselves, we found it valuable to evaluate our testing strategy deficits, identify clear-cut boundaries around what code we wanted to test, and establish standards around what flows through the app should be tested. By going down the path of integration testing, we’ve been able to increase confidence in everyday changes as well as map out a plan for eliminating our manual test cases.